Note: The following guide is detailed with the assumption that you have Curator 3.5.1 installed. If this has not been installed, not all functionality may be present, and results may vary slightly.
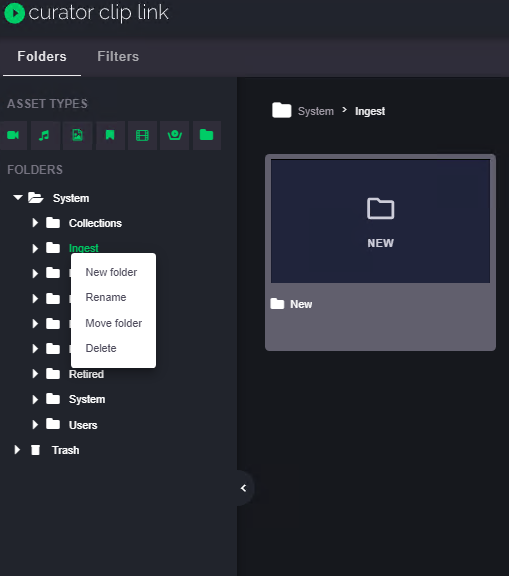
Curator Clip Link comes complete with a system tree which can be found on the left-hand side of the UI when the Folders filter is selected.
This article explains the functions of the available options when the Folders filter is being used.
Using Clip Link's system tree and updated asset list, you can drag and drop assets and folders between these two areas and within themselves under the Folders tab.
Note: You cannot drag assets from the Filters tab Asset List into the Folders tab System Tree. You can however cut and paste between the two as described in the new right-click context menu functionality below.

Creating and managing folders from the system tree
From the same left hand system tree, by selecting and right-clicking on a particular folder, you can create new folders within the selected folder, rename the folder, move or delete it.
Note: you must have the correct read/write/delete permissions in order for this functionality to work.
Setting thumbnails from the asset previewer
Thumbnails can only be set within the limits of the start and end frames for sub-clips, and, for bookmarks, only on the bookmarked frame itself. This option is deactivated for image type assets.

Right-click context menu functionality (from version 3.5.1 onwards)
Note: this will only appear for relevant asset types.
From 3.5.1 and beyond, you are able to right-click on assets to open the plugins menu. The default out of the box options here are shown below:
- Get link to asset - Copies the URL of the selected asset to the user's clipboard.
- Open with - Opens up the selected asset in another application (the default option for this is Open in Logger. This is configurable.)
- Edit/View metadata - Allows you to edit the metadata of the selected assets or against the assets in the search results.
- Navigate to folder - Navigates to the original asset location.
- Show Clipmarks - Shows clipmarks/subclips for the selected assets in a new tab.
- Show asset locations - Opens a new tab displaying the folder(s) and any collection(s) that the selected asset resides within.
- Add to cart - Adds the selected assets to cart.
- Create Collection - Creates a collection, automatically adding the selected assets to created collection.
- Delete - Only available to those who have the correct permissions set, this will move the selected assets to trash. Assets will be deleted from trash when their purge date has been met.
-
Move Assets (under Folders tab) and Move folder acts like a "cut" option for assets (including folders), before "pasting" them with Place assets into the System Tree or Move to in the Asset List.
Note: If you move an asset and then change the selected folder in the System Tree then you will no longer be able to place the assets. The contents of the "cut buffer" are lost when you change folders. You must therefore place the asset by either right-clicking the destination folder in the System Tree or else a child folder already visible in the Asset List.
Removing assets and restoring from trash
Once an asset has been moved to the trash folder, it will remain in trash until the purge date has been met. Once met, the system will remove the file from the trash folder.
With Curator you have the option to restore a deleted asset to its previous location by finding the asset/s in the trash and selecting Restore.
Alternatively, if you want to remove the assets from the trash folder, where their purge date is set much farther into the future than desired, selecting Remove from Trash will allow the ability to re-set the purge date to the current time/date, removing the file almost instantly.

